...
You can also refer to the Rapid Access Cloud Heat user guide for more information.
Configuring RStudio for Deployment
- Download the RStudio Heat template.Login to the Rapid Access Cloud at cloud.cybera.ca. If you do not have an account, register at rac-portal.cybera.ca
- Create a volume to be attached to the new instance. All Click on the "+ Create Volume" button on the left hand side under Compute → Volumes. All RStudio data will be saved in this volume.
- Click on
Orchestration→Stacks→Launch Stacks.the "+ Launch Stack" button under Orchestration → Stacks.
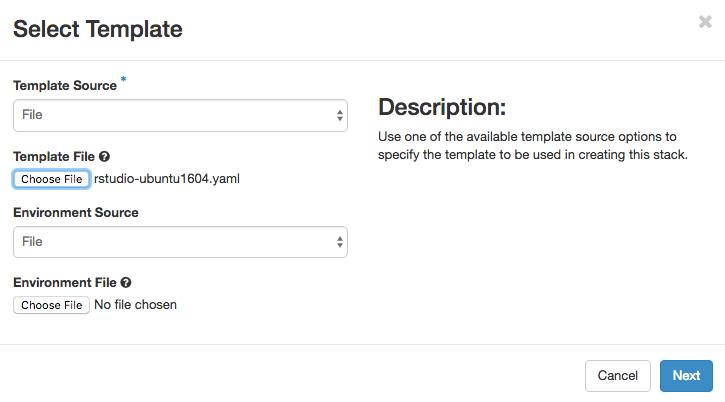
- Select
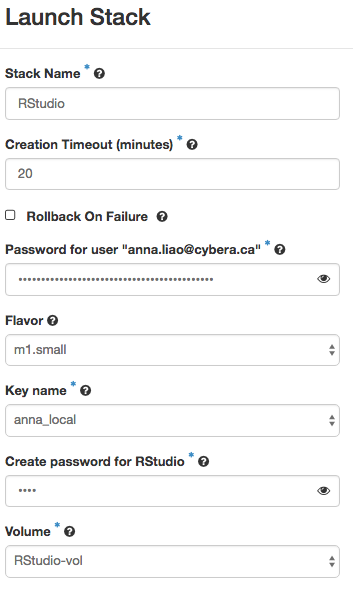
URLin the drop-down menu forTemplate Source. In theTemplate URLfield, enter "https://raw.githubusercontent.com/cybera/rac-heat-templates/master/Select rstudio-ubuntu1604.yaml as theTemplate File". You do not need to input anEnvironment File. ClickNextto continue. Enter parameters for the new stack. For "Password for user", enter your Rapid Access Cloud account password. For "Create password for RStudio", enter a password for the RStudio application.
Find the new RStudio instance under
Compute→Instances.Note Even though the instance may be running, the
bootstrapprocess in the instance has to complete to install RStudio.Login to the instance and run this command:
Code Block watch -n 5 "ps aux | grep bootstrap"You will see a
rootprocess running:/bin/bash /tmp/bootstrap.shWhen the bootstrap process has completed, it will disappear from the process list. That means that RStudio has been installed and is ready for use.
Using RStudio
Wait 15 minutes for RStudio installation to complete.
Using RStudio
In order to access RStudio, a floating IP needs to be associated with it. This can be either via IPv6 (preferred) or IPv4. If you are unsure, you can check here to see if you have IPv6 access (e.g. Telus provides IPv6 access, along with the U of A wireless network).
- If you need IPv4 access, see Associate a floating IP address to the instance.
- To find your instance’s IP address, go to the Compute → Instances (here) and find the address under IP Address.
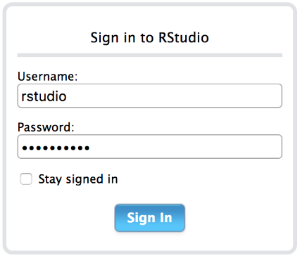
- Enter the IP address in your web browser to login to RStudio. At the login screen, enter the username "rstudio".
Adding more users
One benefit of using RStudio server is that it can be set up using multiple user accounts. The easiest way to add accounts is to log into the server and add users via standard Linux administration tools like adduser, etc.
Note that each user need to be created with a home directory.
The following is an example of creating a user and adding them to a shared folder:
| Code Block |
|---|
sudo useradd -m -d /opt/rstudio/<username> <username>
sudo passwd <username> |
To create a shared folder for all users to have read and write access to and add it to the user just created:
| Code Block |
|---|
sudo mkdir /opt/rstudio/<sharedfolder>
sudo chmod -R ugo+rw /opt/rstudio/<sharedfolder>


ln -s /opt/rstudio/<sharedfolder> /opt/rstudio/<username> |
In order to install libraries accessible to all users, log into the virtual machine hosting RStudio and run the following code:
| Code Block |
|---|
sudo R |
and then within R:
| Code Block |
|---|
install.packages("<package>", lib="/usr/local/lib/R/site-library") |
Changing Passwords
After logging into RStudio, Select Tools > Shell from the top menu. There, enter the command ‘passwd’ and follow the prompts